
Installation Instructions for Wireless Circuit Board WITHOUT Amber/White Strobes
- Turn off power on the light bar.
- Disconnect one of the leads from the battery.
- Cut off the existing circuit board or circuit board plug from the light bar.
- Strip approximately 3/8” from each wire.
- Connect the red wire from the new circuit board labeled PWR/+ to the wire lead coming from the toggle switch.
- All other wire connections will be shown as circuit board/light bar: black/black, red/red, pink/green, yellow/yellow, white/brown.
- Using a heat gun or hair dryer, heat the shrink tube connections, being careful not to melt any of the wires.
- Reconnect the battery.
- Turn on power.
- Test the light bar.
Installation Instructions for Wireless Circuit Board WITH Amber Strobes – Toggle switch
- Turn off power on the light bar.
- Disconnect one of the leads from the battery.
- Cut off the existing circuit board or circuit board plug from the light bar.
- Remove the existing red wire from the center pin of the switch and discard.
- Strip approximately 3/8” from each wire.
- Connect the red wire from the new circuit board labeled PWR/+ to the wire lead coming from the toggle switch.
- The blue wires connect to the yellow wires of the amber strobes.
- All other wire connections will be shown as circuit board/light bar: black/black, red/red, pink/green, yellow/yellow, white/brown.
- Using a heat gun or hair dryer, heat the shrink tube connections, being careful
not to melt any of the wires. - Reconnect the battery.
- Turn on power.
- Test the light bar.
NEW Install Instr for Circuit Board WITH Amber Strobes & Switch connector
NEW Install Instr for Circuit Board WITH Amber Strobes
NEW Install Instr for Wireless Circuit Board WITHOUT Amber Strobes
NEW Install Instructions for Circuit Board WITHOUTAmber Strobes & Switch connector
Batteries
SLA2.2-12 – 12 Volt Battery
6V7AH – 6 Volt Battery
CP1229 – New 12 Volt Battery (any LIW bar with S/N #8000 or higher)
Switches
LIW235 – Lighted Rocker Switch
LIW236 – Lighted Rocker Switch for Flashers
LIW277 – Rubber Boot Cover for Rocker Switch
LIW280 – New Toggle Switch (any LIW bar with S/N #5210 or higher)
H013 – Boot for New Toggle Switch (any LIW bar with S/N #5210 or higher)
Receivers/Transmitters
POTTED RECEIVER – Receiver
LIW-7R-TRANS – 7 Pin Transmitter
LIW-4R-TRANS – 4 Pin Transmitter
LIW-HDW-TRANS – Hardwired Transmitter
Charge Cords
LIW-7R-PWR – Charge Cord for LIW-36’s, LIW-48’s, & LIW-60’s (with or without flashers)
DC-CIG-CORD – Charge Cord for LIWSR1, LIW-MINI, LIW-25, & LIW-25FL
DC-CIG-CORD-2 – Charge Cord for LIW-1 & LIW-AGKIT
- Plug the transmitter into your vehicle’s 7-pin socket.
- Turn on the power switch located beneath the handle. The 3/4″left side marker light will illuminate indicating the power is on.
- Within seconds when you turn on the power, the outer lights on the bar (turn signals) will illuminate quickly and stay on for 2 seconds. This shows you that your battery is fully charged. If ONLY the left hand turn stays on for 2 seconds, then your battery is at least ½ charge capacity. If no lights stay on after you turn on the light bar, then you need to charge the batteries as soon as possible.
- The tail lights will not turn on when you power up the bar, only when the tail lights or headlights in the towing vehicle are turned on. The same for stop and turn signals. This will dramatically increase the battery life between charges.
- Test the markers, left and right turn signals, and brake lights.
- In the event that you should discharge the batteries to the point that they will not operate the wireless light bar, you can plug a cable into the charging socket on the left side of the bar and operate it just like one of our wired light bars. This will not charge the bar, just gives you operation until you can charge it normally.
Keep the bar on the charger when not in use. The batteries will resist developing a memory so you do not have to discharge them all the way. However, they must be charged on a regular basis to prevent them discharging to a very low voltage level.
Wire the included plug to an available 12V power source for charging as follows:
Power to red wire(this wire has a fuse in it) – Ground to black wire
Then plug it into the charging socket on the left side of the bar. A 5 amp fuse is already installed.
When the bar is charging, the GREEN LED near the socket will light. If the LED is not lit, check your connections to make sure that you are connected to full time power.
If you have further questions, please call 800-490-3158.
- Plug the transmitter into your vehicle’s socket.
- Turn on the power switch located beneath the handle. The ¾” LED left side marker light will illuminate, indicating the power is on.
- The tail lights will not turn on when you power up the bar, only when the tail lights or headlights in the towing vehicle are turned on. The same for stop and turn signals. This will dramatically increase the battery life between charges.
- In the event that you should discharge the batteries to the point that they will not operate the wireless light bar, you can plug a cable into the charging socket on the left side of the bar and operate it just like one of our wired light bars. This will not charge the bar, just gives you operation until you can charge it normally.
Keep the bar on the charger when not in use. The batteries will resist developing a memory so you do not have to discharge them all the way. However, they must be charged on a regular basis to prevent them discharging to a very low voltage level.
Wire the included plug to an available 12V power source for charging as follows:
Power to red wire – Ground to black wire
Then plug it into the charging socket on the left side of the bar. A 10 amp fuse is recommended.
When the bar is charging, the GREEN LED near the socket will light. If the LED is not lit, check your connections to make sure that you are connected to full time power.
If you have further questions, please call 800-490-3158.
- Plug the transmitter into your vehicle’s 7-Pin socket.
- Turn on the power switch located on the left side of the light bar. The red LED on the switch will illuminate when it is on.
- The tail lights will not turn on when you power up the bar, only when the tail lights or headlights in the towing vehicle are turned on. The same for stop and turn signals. This will dramatically increase the battery life between charges.
- In the event that you should discharge the batteries to the point that they will not operate the wireless light bar, you can plug a cable into the charging socket on the left side of the bar and operate it just like one of our wired light bars. This will not charge the bar, just gives you operation until you can charge it normally.
You cannot overcharge the battery in the light bar, so keep the bar on the charger when not in use. The batteries will resist developing a memory so you do not have to discharge them all the way. However, they must be charged on a regular basis to prevent them discharging to a very low voltage level.
Wire the included plug to an available 12V power source for charging as follows:
Power to red wire – Ground to black wire
Then plug it into the charging socket on the bottom of the bar. A 10 amp fuse is recommended.
When the bar is charging, the GREEN LED on the left side of the bar will light. If the LED is not lit, check your connections to make sure that you are connected to full time power.
If you have further questions, please call 800-490-3158.

- Plug the transmitter into your vehicle’s socket.
- Turn on the power switch located beneath the handle. The ¾” left side marker light will illuminate indicating the power is turned on.
- The tail lights will not turn on when you power up the bar, only when the tail lights or headlights in the towing vehicle are turned on. The same for stop and turn signals. This will dramatically increase the battery life between charges.
- In the event that you should discharge the batteries to the point that they will not operate the wireless light bar, you can plug a cable into the charging socket on the left side of the bar and operate it just like one of our wired light bars. This will not charge the bar, just gives you operation until you can charge it normally.
Keep the bar on the charger when not in use. The batteries will resist developing a memory so you do not have to discharge them all the way. However, they must be charged on a regular basis to prevent them discharging to a very low voltage level.
Wire the included plug to an available 12V power source for charging as follows:
Power to red wire – Ground to black wire
Then plug it into the charging socket on the left side of the bar. A 10 amp fuse is recommended.
When the bar is charging, the GREEN LED near the socket will light. If the LED is not lit, check your connections to make sure that you are connected to full time power.
If you have further questions, please call 800-490-3158.

- Plug the transmitter into your vehicle’s socket.
- Turn on the power switch located beneath the handle. The ¾” left side marker light will illuminate indicating the power is turned on.
- The tail lights will not turn on when you power up the bar, only when the tail lights or headlights in the towing vehicle are turned on. The same for stop and turn signals. This will dramatically increase the battery life between charges.
- In the event that you should discharge the batteries to the point that they will not operate the wireless light bar, you can plug a cable into the charging socket on the left side of the bar and operate it just like one of our wired light bars. This will not charge the bar, just gives you operation until you can charge it normally.
- The switch on the right side of light bar on the front will illuminate when it is turned on, this switch turns on your amber flashers. When turning on turn signal or hitting the brakes, the flashers automatically turn off for safety and they return to flashing when turn signal or brake lights are turned off again.
Keep the bar on the charger when not in use. The batteries will resist developing a memory so you do not have to discharge them all the way. However, they must be charged on a regular basis to prevent them discharging to a very low voltage level.
Wire the included plug to an available 12V power source for charging as follows:
Power to red wire – Ground to black wire
Then plug it into the charging socket on the left side of the bar. A 10 amp fuse is recommended.
When the bar is charging, the GREEN LED near the socket will light. If the LED is not lit, check your connections to make sure that you are connected to full time power.
If you have further questions, please call 800-490-3158.
- Plug the transmitter into your vehicle’s socket.
- Turn on the power switch located beneath the handle. The ¾” left side marker will illuminate indicating the power is on.
- The tail lights will not turn on when you power up the bar, only when the tail lights or headlights in the towing vehicle are turned on. The same for stop and turn signals. This will dramatically increase the battery life between charges.
- In the event that you should discharge the batteries to the point that they will not operate the wireless light bar, you can plug a cable into the charging socket on the left side of the bar and operate it just like one of our wired light bars. This will not charge the bar, just gives you operation until you can charge it normally.
Keep the bar on the charger when not in use. The batteries will resist developing a memory so you do not have to discharge them all the way. However, they must be charged on a regular basis to prevent them discharging to a very low voltage level.
Wire the included plug to an available 12V power source for charging as follows:
Power to red wire – Ground to black wire
Then plug it into the charging socket on the left side of the bar. A 10 amp fuse is recommended.
When the bar is charging, the GREEN LED near the socket will light. If the LED is not lit, check your connections to make sure that you are connected to full time power.
If you have further questions, please call 800-490-3158.
- Plug the transmitter into your vehicle’s socket.
- Turn on the power switch located beneath the handle. The ¾” left side marker light will illuminate indicating the power is on.
- The tail lights will not turn on when you power up the bar, only when the tail lights or headlights in the towing vehicle are turned on. The same for stop and turn signals. This will dramatically increase the battery life between charges.
- In the event that you should discharge the batteries to the point that they will not operate the wireless light bar, you can plug a cable into the charging socket on the left side of the bar and operate it just like one of our wired light bars. This will not charge the bar, just gives you operation until you can charge it normally.
- The switch on the right side face of the light bar will illuminate when turned on. This switch turns on your flashers. The flashers will automatically turn off for safety reasons when the brake lights or turn signals are turned on. After letting off the brake or turning off turn signal, the flashers will automatically resume.
Keep the bar on the charger when not in use. The batteries will resist developing a memory so you do not have to discharge them all the way. However, they must be charged on a regular basis to prevent them discharging to a very low voltage level.
Wire the included plug to an available 12V power source for charging as follows:
Power to red wire – Ground to black wire
Then plug it into the charging socket on the left side of the bar. A 10 amp fuse is recommended.
When the bar is charging, the GREEN LED near the socket will light. If the LED is not lit, check your connections to make sure that you are connected to full time power.
If you have further questions, please call 800-490-3158.
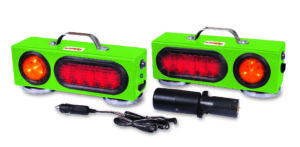
- Plug the transmitter into your vehicle’s socket.
- Place the units so the amber strobes are toward the outside of the vehicle and the rocker switches are on the inside.
- Turn on both units using the top rocker. It will illuminate with a small LED.
- To operate the 2.5” amber strobes, turn on the main rocker switch with the small LED light and the second rocker switch located below it and the strobes will flash. You can operate the lights with or without the amber strobes being on.
- Test the markers, left and right turn signals, and brake lights.
You cannot overcharge the battery in the light bar, so keep the bar on the charger when not in use. The batteries will resist developing a memory so you do not have to discharge them all the way. However, they must be charged on a regular basis to prevent them discharging to a very low voltage level. When charging, the green LED near the charge port will light.
If you have any issues recharging the battery, plug the cigarette lighter adapter into the vehicle, but not into the light bar. If the LED on the cigarette lighter adapter is not lit, the fuse is most likely blown. Replace the fuse with a 5 amp fuse.
If you have further questions, please call 800-490-3158.

- Plug the transmitter into your vehicle’s socket.
- Turn on the power switch. The red LED on the switch will illuminate when it is on.
- The tail lights will not turn on when you power up the bar, only when the tail lights or headlights in the towing vehicle are turned on. The same for stop and turn signals. This will dramatically increase the battery life between charges.
You cannot overcharge the battery in the light bar, so keep the bar on the charger when not in use. The batteries will resist developing a memory so you do not have to discharge them all the way. However, they must be charged on a regular basis to prevent them discharging to a very low voltage level.
When the bar is charging, the GREEN LED near the socket will light. If the LED is not lit, check your connections to make sure that you are connected to full time power.
If you have any issues recharging the battery, plug the cigarette lighter adapter into the vehicle, but not into the light bar. If the LED on the cigarette lighter is not lit, the fuse is most likely blown. Replace the fuse with a 5 amp fuse.
If you have further questions, please call 800-490-3158.
Turn on your wireless light bar before you turn on your monitor kit.
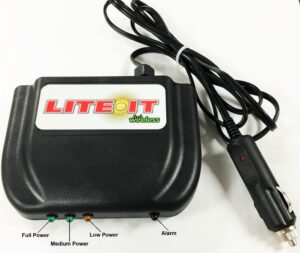
Plug the power jack into the back of the monitor kit, the other end into a 12V power source. Turn on the power switch located on the back panel of the monitor kit. The red LED will light and the alarm will sound momentarily while the monitor kit searches for the signal from the light bar. This will only last a second or two.
The battery indicator LEDs show your battery strength. All 3 LEDs indicate you have over 12.3V. 2 LEDs indicate you have between 11.3V and 12.3V. 1 LED indicates you have between 10.3V and 11.3V. No LEDs means your battery is below 10.3V and should be charged as soon as possible.
If the red LED on thr right side lights up, a 96db alarm will also sound. This means that your light bar is turned off, is below 3V or has gotten out of range of the monitor kit (possibly left behind or fallen off of the vehicle).
There is an approximate 4 second delay before the light and alarm come on. This is to make sure that some outside interference did not cause a temporary delay in the signal.
- Check to see if charging plug is receiving power. The charge plug should be connected somewhere so that it receives full time power. Verify voltage with voltmeter. The largest pin on charge plug is GROUND, and the center pin is for power to the light bar. Check with voltmeter to make sure more than 12v is coming from your vehicle.
- Your light bar is equipped with a green charging light, plug your light bar into the charger and verify that the charging light is lit.
- Check to see if battery leads have come off of the battery terminals.
- If the charger is a cigarette lighter charger, plug the charger into the power port but not into the light bar. The red LED on the charger should be lit if there is power to the port. If the LED does not light, unscrew the end of the cigarette lighter charge plug and check the 5 amp fuse; replace if it has been blown.
- Replace the batteries.
- Make sure that the battery is charged.
- Check to see if the battery leads have come off of battery terminals or the power switch.
- Your light bar is equipped with a green charging light, plug your light bar into the charger and verify that the charging light is lit and then re-test the switch.
- Using a voltmeter, check the voltage of the two outer terminals on the power switch. If the battery is charged or is connected to your charge, the voltage should read 12 volts or more. If it does, turn on the switch and check the voltage of the terminal with the black wire and the center terminal. This should also read 12 volts or more.
- If it reads 12 volts or more, the LED in the switch is most likely blown. This does not affect the operation of the light bar; it is just an indicator light.
- If it does not, the switch is bad and needs to be replaced or there is a wire that is not connected between the battery and the switch. Replacement switches can be found at most electronics stores or by calling Custer Products.
- REMINDER: Our marker lights DO NOT come on when the light bar is turned on, only when markers on towing vehicle are turned on.
- Your light bar has a circuit board that is hardwired into it, when you turn on the switch the red side marker light on left side should illuminate indicating power is on.
- Remove left turn signal and look into light bar and look at the circuit board. When power is turned on the circuit board has 2 alternating LEDs that will be flashing, indicating the circuit board is getting power.
- Check that the transmitter is fully inserted into the socket on the towing vehicle.
- If using a 4 pin round or 6 pin round transmitter, spread the pins on the truck socket so that they make solid contact with the transmitter.
- If your light bar has a 7 pin round, 7 blade flat, 6 pin round or 4 pin round socket on it, plug the appropriate cable into the truck and the light bar to see if it operates as a corded bar. If it does not operate as a corded bar, check that your truck socket is functioning.
- The light bar will not operate off of the batteries if the voltage gets down too much below 9 volts, but the light switch LED can light with as little as 4 volts. Make sure that the light bar is fully charged or plug your light bar into your charger and test the functions of the light bar.
- Test the light bar with the towing vehicle running, a battery that is operating close to 10 volts will not have enough voltage to allow the transmitter to send a signal to the light bar.
- Custer Products uses the industry standards for wiring our plugs and transmitters. However, many times the wiring on a truck socket does not follow these standards. If this is the case, you should rewire your truck socket. Do not attempt to rewire the transmitter or light bar without approval from Custer Products. Any damage caused by rewiring these items will void the warranty.
- If your truck has all LED lights, there may be a current load issue. If there is not enough current load on your truck socket, it may trick the transmitter into believing there is voltage being supplied to a pin that is not there. You can add a 560 ohm, ½ watt resistors to each of the signal pins on your wiring (marker, brake, turn signals) and that will add enough loaf to correct the issue. If you are not comfortable doing this, please contact us.
We are always looking for ways to make our products better. In the past year, we’ve come up with several improvements to our Lite-it-Wireless line. We’ve upgraded our circuitry, our switches and our batteries. When a customer asked us for an explanation on the improvements we’ve made to our light bars, here’s what our Production Manager, Todd Reish, had to say:
“One of the newest features is (2) 12v batteries run in a parallel circuit instead of (2) 6v batteries run in series. The total amp hour rating is nearly identical, however the 12v batteries will allow the charging and discharging to work efficiently, lasting years before needing replacement.
We all know that the 6v batteries were good but their total lifetime was not very good because when charging, one battery in series got charged first and the recharge rate was not efficient and we couldn’t keep the batteries at identical voltage, therefore one battery life was way shorter than the other because of the abuse.
Sorry to make that explanation so long, but I want people to understand that this battery thing will be a big improvement.
The new firmware which we use to program our circuits has been rewritten and upgraded to include a feature that tells the driver how much battery life is left when they turn on the light bar.
Turn on the light bar, if both outer lights turn on for 3 seconds and go off, you have a full charge. Turn on the light bar and only the left turn comes on for 3 seconds and you have over 1/2 charge in your batteries. Turn on light bar and NO lights come on but the light works, you should charge light bar within one hour or it may shut down.
Lastly, we want to be the best and to be the best we have to find out what drivers have told us over the years and fix the “weak links” in our light bars. We have a great product, but we always want to be better, so when we have to replace switches for customers after a year or 2, it is on our radar to come up with something.
We have looked at about 10 different options and finally came up with a switch that is durable and waterproof. Not just a cover on a rocker switch, we have a totally encapsulated metal toggle switch. All rubber coated. And we moved it under the handle that you carry the bar with, so that you can’t knock it off. You can throw the light bar in a tool box or on the ground and you can’t touch the switch now. It should last the life of the product.”
LIW Part Number | Battery Type | Quantity | Notes |
LIW-1 | SLA2.3-12 | 2 | 1 for each light housing |
LIW-1-C | SLA2.3-12 | 2 | 1 for each light housing |
LIW-23-FL | SLA2.3-12 | 1 | |
LIW-25O-4 | SLA2.3-12 | 1 | |
LIW-25O-FL-4 | SLA2.3-12 | 1 | |
LIW-36R-7R | CP1229 | 2 | |
LIW-36RF-7R | CP1229 | 2 | |
LIW-42O-7R | SLA2.3-12 | 2 | |
LIW-48R-7R | CP1229 | 2 | |
LIW-48RFS-7R | CP1229 | 2 | |
LIW-60R-7R | CP1229 | 2 | |
LIW-60RFS-7R | CP1229 | 2 | |
LIW-AG-KIT | SLA2.3-12 | 2 | 1 for each light housing |
LIW-MINI-4 | SLA2.3-12 | 1 | |
LIWSR1 (-7B) | SLA2.2-12 | 1 |